Week 1 - Setting up PostGreSQL and PGAdmin 4
PostGreSQL compared to SQL Server
In your Intro to Database course you used SQL Server and SSMS (SQL Server Management Studio). In this course we will use PostGreSQL and PGAdmin4. PostGreSQL is the actual database server (like SQL Server) and PGAdmin4 is the user interface tool, similar to SSMS.
The following is the step by step instructions for installing PGAdmin 4. FOLLOW THESE INSTRUCTIONS EXACTLY
Download Software - PostGreSQL
Download Link: https://www.postgresql.org/download/
Alternatively get version 15.3-2 directly from the techProf site: download PostGreSQL v15.3-2
Installation Steps
- After downloading the above software, navigate to where you saved the file. Right-Click and choose
Run as administrator - Choose
yesorokon the security warning that comes up. - Click
Nextto start the installation process - Click
Nextto accept the default installation directory.
Note: this will take approx 1Gb of space, but it is important to use the default installation directory. - Click
Nexton the Select Components screen - installing 4 components - Click
Nextto accept the default Data Directory - Enter a password of your choice (twice) and click
Next;
Note: it is very IMPORTANT that you do not forget this password or you will have to uninstall and reinstall everything! - Click
Nextto accept Port 5432 - Click
Nextto accept the Default Locale - Click
Nexton the Pre-Installation Summary - Click
Nextto start the installation process!
This will take a few minutes pending the speed of your computer! - Once complete you will be asked if you want to use StackBuilder to install extra components, do not use this at this time, you can just close the setup at this time.
Setup PGAdmin4
Once the above installation is complete, you should be able to run a program called PGAdmin 4 from your start menu. We will have to connect this to your PostGreSQL installation and setup a database and user.
- When you first load PGAdminSQL, there will be a servers folder in the "object Explorer" on the left side. If you expand that folder, you will be prompted for your database password you created during the installation of PostGreSQL.
- Once you have correctly entered the password, the folder will expand showing
Databases. The databases will expand out to show a default database called "postgres" and the Login/Group Roles section.
Creating a User
We will want to create a user in the local database that matches your user on the database user on opentech such that you will not have to always be switching the connections strings when uploading code to opentech.
- Right-Click on "Login/Group Roles" and choose "Create" -> "Login/Group Role"
- In the "Name" box enter the same username that you use on the opentech server.
- Under the "Definition" tab enter a password (it should be the same password you use on the opentech postgreSQL server - Student ID probably).
- Under the "Privileges" table all options should be chosen except the bottom one (streaming replication).
- Under the "Membership" tab, click on the "+" beside "Member of" and choose "pg_signal_backend" and click the admin checkbox.
- Click
Saveto save the user. This information can be changed later as long as you do not forget the master PostGreSQL password.
Create your matching Database
We will create a matching database on your local server with the same name as your database on the opentech server likely: username_db
- Right-Click on Databases and choose Create/Database
- Enter the name for the database: "username_db" made up of your opentech username followed by _db without spaces.
- Change the owner to the user you created above.
- Click
Saveto create the database.
Running the SQL Script or SQL Commands
In order to add tables and data to your local database, you will need an SQL window. This is down by clicking on the database icon ![]() , that will open a new SQL window.
, that will open a new SQL window.
- Open your SQL script file that you either created or was provided to you. You can open the file directly in PGAdmin4
 or open it in notepad and copy and paste the contents. A sample database we will use in class is: Lab 7 Bond Movies
 - highlight the lines you want to execute (All of them for a creation script) and click the execute button.

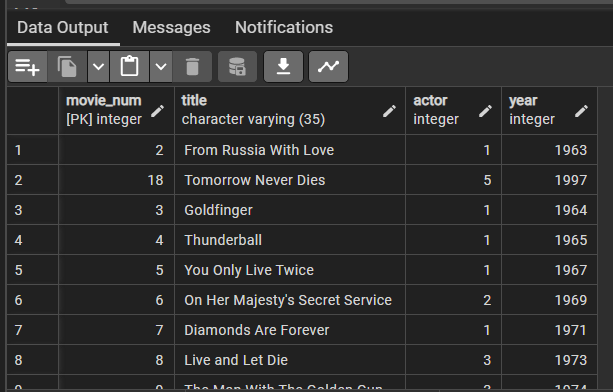
- You can then erase all the content of this file and type SQL commands in this window, highlight them, and execute them. Try this by entering:
SELECT * FROM movies;, highlighting it and executing it. A new Data Output window will appear at the bottom showing the list of movies.
If everything was down correctly, you should now have a mirrored copy of the database on both the opentech server and your local installation.